Tuning

Doubts about the order of regulation

10 replies 2,522 views

Started by

GIUSEPPEPIANO

Member

Member

Opening post by GIUSEPPEPIANO

Posts
49
City
COSENZA

Hello to all the friends of the forum. I am at Grotrian-Steinweg in Germany and I am following a grand piano regulation course.

We started yesterday and so far the order of regulation we have addressed is as follows:

Regulation of the pins

Keyboard leveling

Centering of the hammers on the strings

Papering with backing

Re-checking hammer centering

Correction of hammer orientation with the flame

Centering of the repetition lever under the rollers

Regulation of the pusher

Regulation of repetition lever height

Centering and alignment of the hammer rail

Escapement regulation

In particular, I wanted to draw attention to the centering of the hammers. The technician first had me align all the hammers under the strings, then extract the action and correct with paper the keys that were incorrectly spaced at rest; but don't papers only have the task of correcting orthogonal corrections? It doesn't seem to me that they can space the hammers at rest... when I pointed this out to him (given that I don't speak a word of German, he doesn't speak English... so we understand each other through gestures), he implied that it is not necessary to have the hammers travel a wide circumference to verify deviations, because the hammers do not travel all that space when playing, impacting the strings... so I understood that for him, the deviations the hammer makes while traveling a wide circumference outside of the action are superfluous. Let's be clear, in the end everything turned out perfect, so I am wondering if it is simply a specific Grotrian "modus operandi"...

For the rest, we addressed escapement regulation but skipping the hammer-string distance, don't ask me why.... the downside of not being able to communicate is that you cannot clarify important points...

thanks to all

Moderator

Reply 2 by pianoexpert

Posts
3,876
City
rocca di papa

Up to "hammer regulation" everything is okay. The deviation of the hammer rise is important, at least over an arc of 50 cm of rise. Then it is corrected with the flame. Hammer-string distance is important. Then escapement and drop points. Let-off point. Spring. The pre-regulation centering and alignment phase is fine. Always check the friction of the repetition lever pins. The spring force affects the "suppleness" of the action. The springs must not be too heavily loaded.

Member

Reply 3 by GIUSEPPEPIANO

Posts
49
City
COSENZA

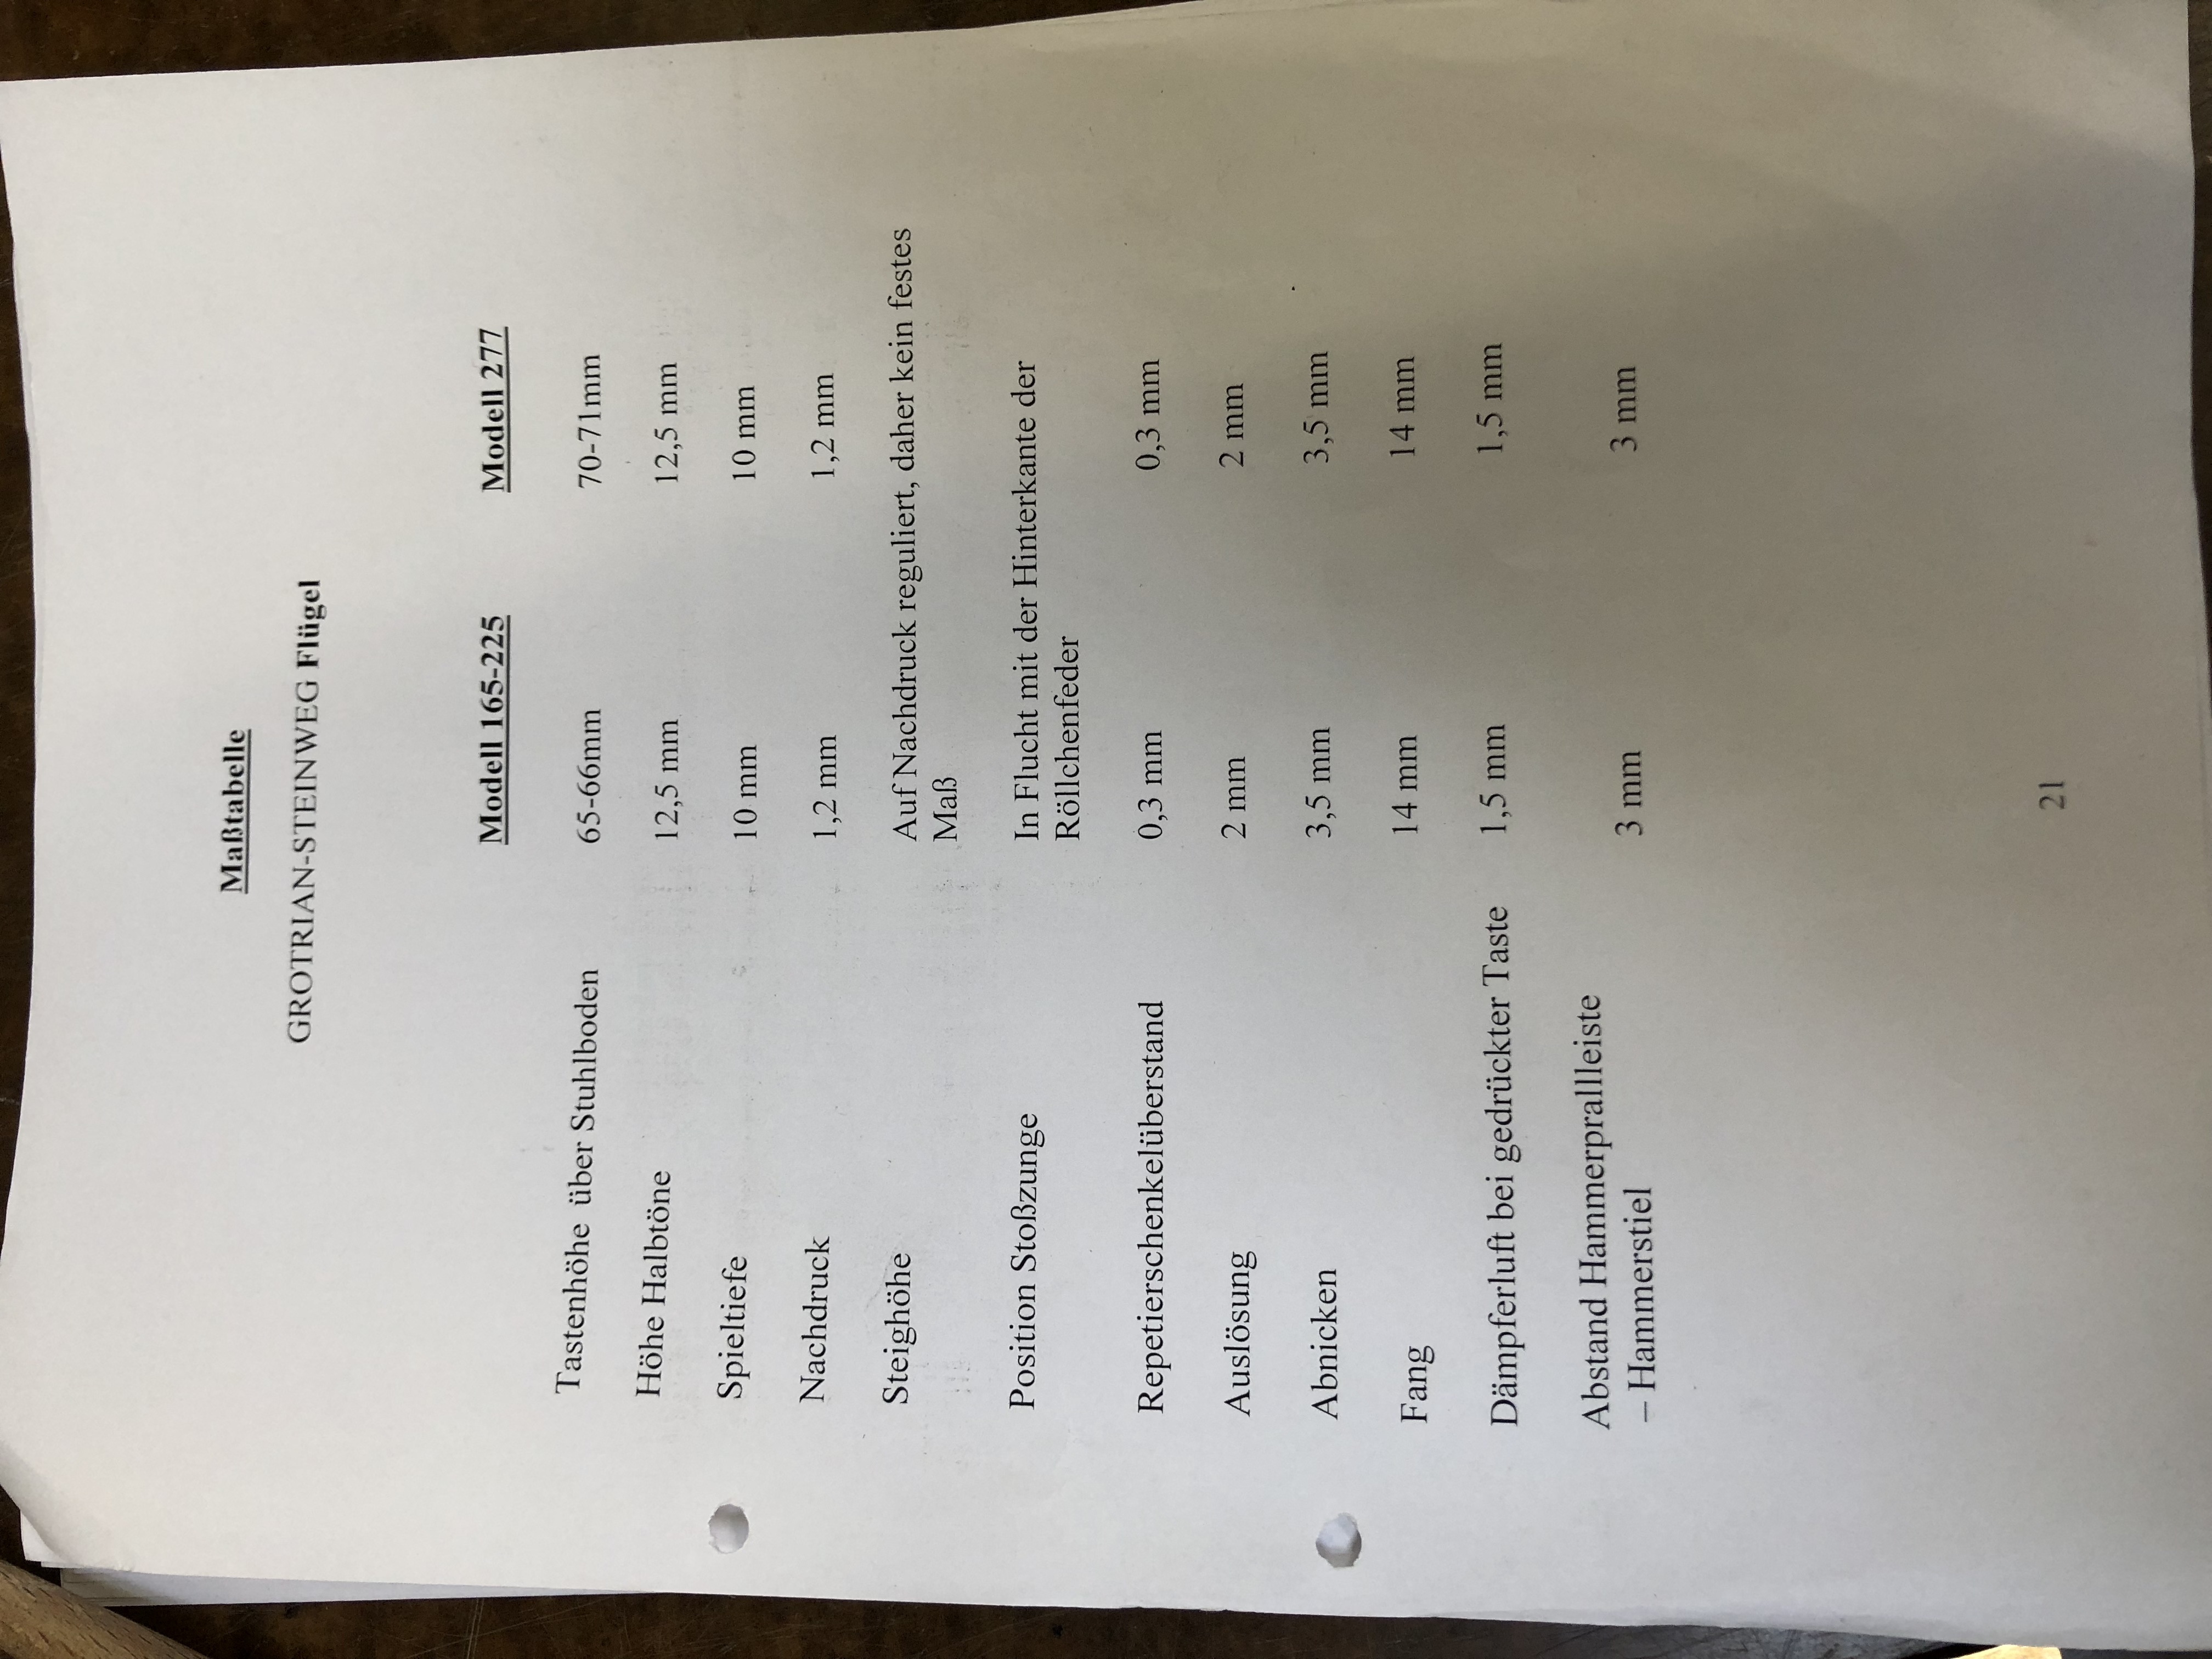
Thank you Maestro, precious confirmation. However, I understood why we addressed the hammer-string distance adjustment only after the escapement calibration. Paradoxically, in the Grotrian measurement manual, there is no entry for “hammer-string distance” (it is in German, but as can be seen in the photo, there is nothing close to 46-49mm). To derive it, they proceed in the following way: after setting the let-off to 10mm, a 0.50 washer is taken and slipped over the key let-off spring... the adequate hammer-string distance is that which ensures that, by pressing the key slowly, the hammer no longer trips except with a slight pressure on the key. This operation is repeated at the white keys near the bushings... then the action is removed and the hammers are aligned. Since in the specifications the let-off is set at 1.2mm and a 0.50 washer is used as a sample, it follows that the sliding phase of the repetition lever from the roller is approximately 0.7/0.8mm. I found this technique very interesting, especially if the exact design hammer-string distance of a given piano is unknown.

What do you think?

1DE443E2-4227-4F22-AEE0-2AF5AD841435.jpeg

Moderator

Reply 4 by pianoexpert

Posts
3,876
City
rocca di papa

In my opinion ...it is not an "orthodox" procedure. If I were to proceed this way on a piano where the hammer drilling or the position of the repetitions has been modified, I would obtain a false measurement!!! If it is possible to go below 10 mm, that is a good thing. The fact that they start from the regulation of the capstans shows that the distances between the center of the hammer flange-string and the center of the bridge flange-string are known. These distances, together with the diameter of the repetition hammer and the height of the drilling (there is a formula), determine at what distance the hammer must be from the string and what the minimum let-off measurement is. Naturally, Steinway also gives precise specification values... which are, however, subject to variation. If the specifications of a piano are not known, one starts from a distance of 45 mm... but one always goes to check the riser-repetition hammer alignment!!!!! If, in fact, the drilling had been incorrect or if the hammers had been shaved, the aforementioned procedure would lead, yes, to a correct aftertouch, but with an unsatisfactory "mechanical geometry," compromising much of the energy developed by the pianist. In my opinion, instead, as a consequence of a different hammer-string distance, establishing a greater or lesser let-off distance is preferred, while maintaining the control of the correct geometry. This is why I am opposed to significant shaving of the hammer rail. This results in a subsequent change in geometry with necessary compensation of the specifications.

Member

Reply 5 by giovannig

Posts
514
City
Monza

The important thing is the result obtained, not where one starts. A great technician taught me this.

Anyway: the hammer excursion for checking the correct let-off, so that they are all parallel, should be considered within the normal stroke and not beyond. But if the piano is not new, it can happen that the let-off is correct within 45/50 mm, but at the same time, lifting all the hammers causes them to collide with their neighbors (this is not good and must not happen. It happens because there are probably warped capstans, bent shanks, etc... and these are situations that must be corrected regardless). And it is corrected with paper shims. With a lamp, one instead corrects any inclination of the side hammer at rest. Then the check is repeated.

If the piano is new, it is fine to find the correct hammer-to-string distance starting from the fixed backcheck. I don't see anything strange about it. Sometimes in the preparation of hammers, even in the factory, on identical pianos, it is decided to remove more or less felt compared to the previous or subsequent specimen. It is therefore impossible to set a hammer-to-string distance that works for all. The backcheck is fixed, and the distance follows: it will be 45, 47, 50 mm... I have seen brand new Steinways working with a hammer-to-string distance of 50 mm.

The important thing is the result, and therefore what the pianist feels when playing.

Anyway, I can state that when going to a client's house to check the state of a regulation, the first thing checked is the hammer-to-string distance with a gauge: anomalous measurements and pianist discomfort force more in-depth evaluations.

Member

Reply 6 by noname

Posts
100
City
Eboli
GIUSEPPEPIANO wrote:

On ‎22‎/‎03‎/‎2018 at 20:41, GIUSEPPEPIANO said:

take a 0.50 washer and slide it over the key dip felt... the adequate hammer-to-string distance is that which ensures that, by pressing the key slowly, the hammer no longer snaps unless with a slight pressure on the key. This operation is repeated corresponding to the white keys near the bushings... then the action is removed and the hammers are aligned. Since in the specifications the aftertouch is set at 1.2mm and a 0.50 washer is used as a sample, it follows that the sliding phase of the repetition lever from the roller is approximately 0.7/0.8mm.

Hi Giuseppepiano, thank you for sharing this experience of yours.

i would like to ask you regarding the step I quoted above, what exactly do you mean by "sliding phase of the repetition lever from the roller" of 0.7/0.8 which you then add to the thickness of 0.5 to get the required 1.2. I have always thought, in this adjustment, that the thickness used under the key provided the same measurement as the aftertouch.

Member

Reply 7 by GIUSEPPEPIANO

Posts
49
City
COSENZA

Hi kklaus,

in reality, the 0.50 washer could be replaced with a 1.2mm shim, but in my opinion, the adjustment would be much more difficult and hard to achieve accurately; in that case, the upright (since there is no depth) would not move at all, and it would be difficult to understand exactly how much to shim with the papers under the felt pad....by sliding phase, I mean from the moment the upright touches the drumhead until the moment it leaves it, causing the hammer to fall.

In essence, at Grotrian they verified the correct "play," and to do this they used a 0.50 washer instead of a 1.20 (which is the measurement for full aftertouch) to have tactile feedback that is more easily adjustable to one's liking (in reality, it would be easier to feel it by hand rather than explain it in theory).

Member

Reply 8 by GIUSEPPEPIANO

Posts
49
City
COSENZA

I would like to take this opportunity to ask a related question, without opening another topic.

I am restoring a Yamaha C5... specifically, I had to replace the green key rest felt which was worn out. However, the new one seems a bit too thick to me, even though I ordered it directly from Yamaha..... I noticed it because the keys end up leveled at 57/58 mm from the keybed, very far from the 64 mm that Yamaha itself specifies.

I then tried to adjust a sample key by bringing it to 64mm (thus shimming quite a bit), then adjusting the hammer-string distance, let-off, escapement, etc.

The key is well-adjusted (including aftertouch) despite the variation in the background; the only thing that is visually noticeable are the tips of the balancer which protrude very slightly outside the key hole (a couple of mm). This is because I had to shim on the balancer.

I wanted to ask, in your opinion, is compensating for the background variation (even if minimal) by acting on the balancer a valid solution, or does this modify the geometry of the action?

In my opinion it shouldn't, but I am waiting for technical opinions from Maestro Ferrarelli and anyone else who wants to provide a contribution.

Member

Reply 10 by giovannig

Posts
514
City
Monza
GIUSEPPEPIANO wrote:

11 hours ago, GIUSEPPEPIANO said:

I would like to take this opportunity to ask a related question, without opening another topic.

I am restoring a Yamaha C5... specifically, I had to replace the green key rest felt which was worn out. However, the new one seems a bit too thick to me, even though I ordered it directly from Yamaha..... I noticed because the keys result in being leveled at 57/58 mm from the keybed, very far from the 64 that Yamaha itself specifies.

I then tried to adjust a sample key by bringing it to 64mm (therefore shimming quite a bit), then adjusting hammer-string distance, let-off, dip, etc.

The key is well-adjusted (including aftertouch) despite the variation in the key dip; the only thing that is visually noticeable are the ends of the balancer which protrude very slightly outside the key hole (a couple of mm). This is because I had to shim on the balancer.

I wanted to ask, in your opinion, is compensating for the variation in dip (even if minimal) by acting on the balancer a valid solution, or does this modify the geometry of the action?

In my view it shouldn't, but I am waiting for technical opinions from Maestro Ferrarelli and anyone else who wants to provide a contribution.

I do not agree; adding a stack of papers in the center to compensate for an incorrect thickness of the key rest felt seems like an absurd remedy to me, one for someone who wants to intentionally harm themselves. The correct thickness of the rest felt can certainly be found for sale to replace the old one without having to resort to Yamaha, which obviously can only provide parts suitable for current models.

If we put many pieces of paper under the keys, in the center and consequently on the front ends, we obtain unstable and compressible key support, both at rest and in motion. Instead, I believe that stability and precise dip, in addition to being fundamental requirements for any regulation, restore to the pianist a sense of agility on the keyboard that also translates into less fatigue when performing fast passages. The impact of the key on the bottom must be as elastic as possible so as not to dissipate too much energy on the cushion, and to make it available for the prompt rise of the key. Dynamically, the efficiency of a keyboard does not depend solely on the mass or arrangement of the weights, and creating an accordion effect between the papers is not advisable.

The premise of "shimming" to compensate for distances that can be minimized in principle is, in my opinion, wrong. By doing so, we also modify the inclination of the key, so one must evaluate if the key pilot continues to work correctly, without sliding, if the capstan does not rise too high at the moment of the strike, etc., etc.

As far as the dip is concerned, once the hammer-string distance is fixed, it is very simple to evaluate which one is correct; one must observe that after the hammer falls on the repetition lever (or on the second let-off, to put it in the way that philosophical technicians do not like) by bringing the key to the bottom slowly (without compressing the green felts, which must be of medium/high density), there is a hint of hammer rise: this gives the technician the guarantee of having completely released the mechanism.

Tighter adjustments result in a sense of "stiff action" while playing.

Measuring aftertouch with shims can work on ultra-new actions that are ultra-uniform in their behavior, and it is an approach more useful to the amateur than to the professional technician. This is why it makes sense to describe certain methods in a forum like this, even if they are not commonly practiced in technicians' workshops.


Member

Reply 11 by noname

Posts
100
City
Eboli
GIUSEPPEPIANO wrote:

13 hours ago, GIUSEPPEPIANO said:

in reality the 0.50 washer could be replaced with a 1.2mm shim, but in my opinion, the adjustment would be much more difficult and hard to perform accurately; in that case, the upright (since there is no depth) would not move at all and it would be difficult to understand exactly how much to shim with the papers under the felt pad....by sliding phase I mean from the moment the upright touches the drumhead until the moment it leaves it, causing the hammer to fall.

In my opinion (but I am probably wrong) it is simpler to use a 1.2 shim directly to have a post-click of 1.2.

https://www.youtube.com/watch?v=E-VB3tHb8MA

Ciao,

Log in to participate